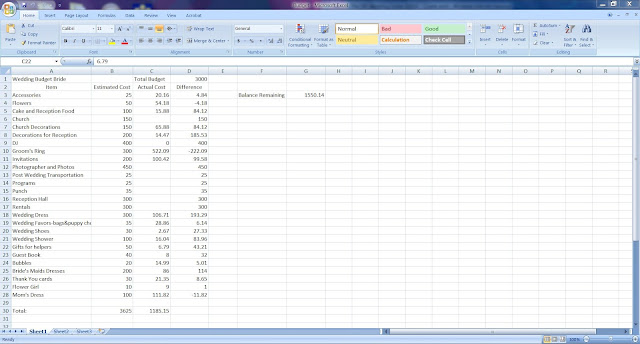
Let's start with the boring stuff first. Get out a pencil and paper or open an excel document, because we are going to start at the beginning by setting up the budget. Excel has some premade wedding budgets that you can download from the Microsoft page. I decided to set up my own because then it works exactly the way I want it to. Mine might be lacking some areas that you need to include and then again it may have some extras that you won't need. I have attached a screen shot of the file for your viewing pleasure. If you have any questions about setting up your own, please let me know!
Now, lets start with invitations/save the dates. Ours cost about 78 cents total. That includes the postage stamp and envelope. That's crazy cheap right? I know you have begun to look at invitations and the cheaper ones start at a dollar a pop and that doesn't include a return card or envelope. (My scanner is not working so I can't post a finished picture of our invitation, but I will add ones ASAP.)
This is where being an artsy person or knowing one comes in handy as well as the DIY part. For our wedding, we found that the save the date that we saw online were closer to our personality than a lot of the formal and stuffy invitations. Our invitations consisted of card stock from Joann's or Michael's. They run under 5 dollars for 50 pages. We cut these in half to get 100 total from a package. If you have a 25% off or more coupon this will add to your savings. We will be using the left over paper for other things in the wedding. Waste not want not and all.
We then used a rubber stamp to get a cute design for under 10 dollars. The back had simple writing on it like a normal invitation and to add some elegance we rounded and embossed the corners. These embossers/rounders come in many different styles. They run about 14 dollars and the best ones in my opinion are made by Fiskars. Again, they can be found at Michael's or Joann's where you now have coupons to. http://www.joann.com/search/_corner_punch/brand_fiskars/ The other side had a picture which we designed and then printed at CVS and a bow. These did take a bit of time to make and several people. If you start early and do it in steps, it seems like less of a challenge.
For the wedding shower invitations, I designed a front and back and then printed four to a page on the same type of card stock. Stephen cut them out with a straight edge cutter and it took me about an hour to address them all. They then got a postcard stamp and were dropped off into the mail. They are pictured below.
If you have any questions about this you can always email me at katheryn.mangelsdorf@gmail.com Other than that, just keep planning. I'll have a new post up soon with another part of the wedding planning process.
Also, if you have not signed up for the Knot, you should do so. They have tons of great ideas and tips on their site. www.theknot.com They also offer a free wedding website which allows guests to RSVP (for free :) ) and keep updated on your wedding.
Happy Planning!


and keep updated on your wedding.
ReplyDelete